East Idaho Art Market to feature local fine artists in Saturday event

East Idaho Art Market to feature local fine artists in Saturday event

REXBURG — The East Idaho Art Market is back this weekend after a stellar first event last summer. The second annual fine art market will take place this Saturday, Aug. 26 from 10 a.m. to 5 p.m. at the Madison School District field at 60 West Main Street in Rexburg. The field is located north of the district office building and east of Broulim’s.

The market’s founder, Alex Reed, says this year’s market will feature a variety of artists, mostly from southeast Idaho, offering fine art across the spectrum of artistic media. About 30 vendors will be at the market, which was created to showcase local fine artists and artisans. 

“We have someone who does ceramic pottery stuff — mugs, bowls, plates — someone who tumbles their own rocks and makes them into jewelry, painters of different media, etc.” Reed says. 

Art appreciators can also enjoy some of the culinary arts at the market.

“We have a taco bus coming, and the popcorn people coming. We’ll have drinks and someone making macarons,” she says. 

The East Idaho Art Market debuted in August 2022. As artists themselves, Reed and co-founder Shelby Thayne created the event, which was inspired by the Utah Art Market, as a way for local fine artists to have a unique opportunity to showcase and sell their work in a curated market. The two also hosted a holiday art market and plan to do so again this November.  

Reed says she was happy with how the first summer market went and hopes this weekend’s event will be similarly successful.

“The whole energy and vibe was exactly what we wanted it to be,” she says. “I think what we created is a really good environment where people can actually talk to the artists and get to know them, and artists can get to talk to the community and share what they’ve created with their heart and soul. I think it just created this really cool community bonding moment and people creating beautiful things inspired by where we live.”

For more information on the East Idaho Art Market, including information about vendors, visit the market’s Instagram.

Scott Sweet02
Melissa Hillman will be one of about 30 artists featured at this Saturday’s East Idaho Art Market in Rexburg. | Courtesy photo.

Oklahoma Photographer’s Creative Approach Touches Hearts Nationwide

Oklahoma Photographer’s Creative Approach Touches Hearts Nationwide

The work of a McLoud photographer has been seen and shared hundreds of thousands of times.

Her creative approach in honoring a military family touched hearts well beyond the limits of her small town.

She works primarily out of the living room of her home. There, toys fill the extra spaces. Photos of her husband and children fill the extra space on the fridge.

It’s easy to tell what fills up the most space in Carrie Sanders’ heart. Capturing those moments for others fills up most of the space on her computer. “I have this deep drive passion for it,” said Sanders.

She looks through her portfolio of maternity shoots, weddings and newborn photos. It’s clear she loves to capture families. She taught herself the post-production software.

“This is my baby. This goes with me everywhere,” she said holding the camera she also taught herself to use. When a client came with a new request, she would teach herself again.

 “Most people, when they do maternity photos the dad is there,” she explained.

This request involved a dad hundreds of miles away. He is deployed in Africa. “Being able to bring them together in the same place even though he couldn’t be there, I think that’s what made it special,” she said.

Through Photoshop, she was able to bring them together in one photo. “Basically, I just cut him out from the background and I placed him – I dragged him over into her photo,” she explained.

 The composite photo struck a chord. In no time, it racked up nearly four million views on social media.

“There’s somebody else out there who is away from their family, their wives, their children. They’re fighting for our freedom,” she pointed out. It’s the reason she believes it moved others.

To understand her love of capturing these moments, you have to understand the moments in Carrie’s own life. “I came from a really bad home life,” she recalled. “As a kid I got adopted through Indian Child Welfare when I was 12. I remember the environment I was kind of raised in.”

It’s the reason she wants a different life for her own children. She now captures those moments in print and canvas. “To do it for somebody else,” Sanders said. “That’s just even more special.”

To see her work, click here.

Behind the Lense; My Hockey Photography Equipment and Setup

Behind the Lense; My Hockey Photography Equipment and Setup

I’m putting this article together mostly for other sports photographers working for Pro Hockey News.  I’m not an expert, and I’m not a professional, but my approach is professional (for the most part).  I’m often asked about how I do things, or what equipment I use, and although I’m sure there’s probably other sports photographers that have better equipment and better technique, I thought I would write down my approach to shooting sports and specifically, hockey.

With equipment, where do I begin?  It’s difficult because although I have a lot of stuff, I didn’t get it all at once, and none of it was bought brand new and for full price.  Everything I own was carefully purchased on the second hand market, primarily on Ebay, but also with other sources.

After lugging around multiple bags, I finally got a Pelican case.  These are hard-cases that are sturdy, somewhat weather proof, and they hold a lot if you pack well.  Plus, it has wheels.  I bought the Pelican 1560 case on Ebay for about half price.  And even at that price, it was still expensive, but worth it.

As you can see in this photo I took with my cell phone, in the dark, I have four Canon camera bodies crammed in.  Two have lenses attached.  One lens is a Canon 70-200mm f/2.8, and the other is a Canon 16-35mm f/2.8.  There’s a Canon 430EX II Speedlite.  There are several Pocket Wizard remote triggers and assorted cables.  And of course, there are spare batteries and assorted small tools.

Note that there’s nothing special about these cameras.  The two that I carry around are Canon 7D Mark II models.  The remotes are Canon 7Ds.

Although the Pelican case rolls reasonably well on indoor smooth flooring, I prefer avoiding relying on it’s wheels when going from the back of my car up to the arena.  So I bought a foldable cart to carry the case and other items.

I usually have a Sigma 120-300mm f/2.8 lens with me at games, and if I use it, I have a monopod that I attach to the lens to support it and the camera.

Since I can’t be in multiple places at once, but I like getting photos from different angles, I set up remote cameras in the arena.  I usually show up three hours (more if it’s an NHL arena) prior to the game, and do my setup.

I like to sync the time on my cameras so that after the game, the photos are in order by when they were taken, and so even if a shot is done by more than one camera and different vantage points, they appear close to each other in the series of photos.

To sync, I always pull up a clock app on my phone and take a shot of the clock with each camera.  In my post processing, I can use that image as a reference to adjust the date/time on photos from each camera.  I’ll explain more on that later.

I equip my remote cameras with a Pocket Wizard PlusX.  I make sure all of my triggers are set to the same channel so when my master (on my handheld) camera fires, the remotes also fire.

One camera is setup on a railing in an area near where media, off-ice officials, and broadcasters are situated.  So the camera is reasonably safe from being pilfered with.

This camera is set up with an old manual focus Canon FD 200mm lens  It’s great glass, but since I always prefocus my remotes on their target (the opposing team’s goalie area), I wouldn’t need automatic focus anyway.

I mount the camera using a Manfrotto Magic Arm and clamp.

If this were an area with more people below, I would also attach a safety cable to the camera and the Magic Arm.

The second remote camera goes up in the catwalk on a platform that shoots directly down on the goalie’s area, with a great overhead view.

imageI usually have a remote camera set up above the visitor’s goal.
” data-medium-file=”https://prohockeynews.com/wp-content/uploads/2023/08/52032983773_9f9bb16bd0_o-200×133.jpg” data-large-file=”https://prohockeynews.com/wp-content/uploads/2023/08/52032983773_9f9bb16bd0_o.jpg” decoding=”async” loading=”lazy” class=”size-full wp-image-223779″ src=”https://prohockeynews.com/wp-content/uploads/2023/08/52032983773_9f9bb16bd0_o.jpg” alt width=”1000″ height=”667″ srcset=”https://prohockeynews.com/wp-content/uploads/2023/08/52032983773_9f9bb16bd0_o.jpg 1000w, https://prohockeynews.com/wp-content/uploads/2023/08/52032983773_9f9bb16bd0_o-200×133.jpg 200w, https://prohockeynews.com/wp-content/uploads/2023/08/52032983773_9f9bb16bd0_o-768×512.jpg 768w, https://prohockeynews.com/wp-content/uploads/2023/08/52032983773_9f9bb16bd0_o-450×300.jpg 450w” sizes=”(max-width: 1000px) 100vw, 1000px”>

I usually have a remote camera set up above the visitor’s goal.

As you can see, a safety cable is used here.  It is attached to the camera with little metal i-rings that I bought off Ebay, and I have them attached to most of my cameras.

Other than the location and the safety cable, the setup is the same, and the Pocket Wizard trigger is the same as with the first remote camera.

I’ve recently bought “pre-trigger” cables for these two setups.  This isn’t absolutely necessary, but without them, both cameras will sleep during times of non-use during a game.  And then when I remotely trigger them, there’s a slight delay.  WIth the pre-trigger cable, both cameras are sent a signal from the Pocket Wizard that keeps the cameras awake.  This makes their reaction to my triggering them during a game, to be almost instantaneous.  The down-side is that it runs the battery in the cameras down faster.  So I always make sure I have fresh batteries before every game.

Both remote cameras are manually focused ahead of time.  This works much better than relying on auto focus, which can sometimes get confused on what to focus on (plus, the auto focus causes another slight delay).  Every photographer that I know that uses these triggers, manually focuses their remote cameras.

The camera that I use most during games is the one equipped with the 70-200mm lens.  I have a Pocket Wizard set to “transmit only”, mounted on the hot shoe.  This trigger is a Pocket Wizard Plus IV, which has a lower profile from the other triggers, but it works the same.  The only reason for the lower profile is that it doesn’t interfere with my hat when I’m shooting.

Note the gaffers tape on top of the trigger.  The trigger has another hot shoe on top of it, and I don’t like it snagging on my hat, so I cover it with tape.

During games, when I focus on the goalie from somewhere on the glass to the side of the goalie, the remote cameras also fire.  So even if I have a player or ref in my way sometimes, the other two cameras have a good chance of getting the shot.

After the game, I will probably have a lot of throwaways from the remotes, but you never know when there’ll be that great action there at the goal, and it’s great to get it from different angles all at the same time.

Back home, I pull the photos from each card onto my computer, and I use Photo Mechanic on them.  The first thing I do is sort by camera serial number.  I then set the time correctly based on that first image I took of the clock app on my phone.  With the correct time set, I select the rest of the photos taken with that particular camera.  Photo Mechanic uses the adjustment from what it made on the clock image, and applies it to the photos I selected.

I then do this same procedure for the three other cameras I use at games.

Once the time is set properly on all of the photos, I sort by capture time, and then set the meta data I want, which typically includes copyright information, GPS coordinates (from a map in Photo Mechanic) and keywords to be included in the EXIF information on all of the photos.

I can then use Photo Mechanic to cull photos I don’t want.  I can also set other keywords on various images.   Photo Mechanic also has a “code replacement” feature where I can enter different codes and it will expand them in the Capture of a photo, so tell what player, what team and what jersey number is in the shot.  It’s a handy feature.

Once I have all the photos tagged and culled, etc, I rename them using Photo Mechanic.  The photos are renamed with a datetime based on the time each image was taken.  I then use Photo Mechanic to copy the photos to their final destination on my external hard drive.

Lightroom is then used to import the photos, read the metadata from the sidecar files.  Before doing any processing, I actually go to the trouble of using Lenstagger (a plug-in) to inject the correct information about the manual lens, so that the photos taken with it have EXIF information that actually reflects that they were shot with that FD 200mm old-fashioned lens.  This step isn’t necessary, but I think it’s a nice touch.

I do my Lightroom adjusting, including noise reduction, and apply this to the entire set of photos.  I then go through and crop and straighten the shots.  I can then render jpg files to send out at that point.

I should also mention that while I’m doing all this post processing, I have batteries being recharged and making sure I’ve tested the AA batteries that go in each trigger, so I’ll be ready for the next game.

As you can tell from all of this, the equipment isn’t as important as the steps. Some people might not do everything I do.  And to be honest, if I’m on deadlines and got a series of games (such as with a tournament), I might not do everything that I normally do.  The key is that whatever you do, you have to be prepared.  Make sure you have plenty of fresh batteries (for the cameras and the remote triggers).  Show up ahead of time so that you’re not rushed, and you can go through your setups and test everything to make sure you haven’t forgotten something.  That really is the key; being prepared and not being rushed.

In the end, there’s no magic.  The equipment isn’t top of the line (I wish it was).  It’s photographic technique and a few gadgets, and lots of preparation.  And I didn’t do this all at once.  I built on it a little at a time, and that got me where I am today.  Anyone can do it.

Contact Les: Les.Stockton@prohockeynews.com

Editor’s Note: Les Stockton is a long-time photographer for Pro Hockey News. He is the staff photographer for the Tulsa Oilers of the ECHL, and has covered numerous events for PHN across several leagues, including at the NHL level. In his time away from hockey he covers several other sports, including indoor football, Semi-pro football, rugby, roller derby and dirt track racing, to name a few.

If you would like to join Pro Hockey News as a writer or photographer, stop by our recruitment page by clicking here.

New photography studio wants to empower women

New photography studio wants to empower women
Caitlin Baseggio, executive director of the Logan County Chamber of Commerce, presents a plaque to Nicole Capps, owner of Boudoir by Nicole at ribbon-cutting ceremony Tuesday, June 22, 2023. (Callie Jones/Journal-Advocate)

A new photography in studio is helping women look and feel their best. Boudoir by Nicole was welcomed to the Logan County Chamber of Commerce with a ribbon-cutting ceremony Tuesday and will celebrate its grand opening on Monday, Aug. 28.

Located at 621 W. Main St., the studio is owned by Nicole Capps, who does everything from family and couple photoshoots to senior photos. Her favorite kind of photography, though, is boudoir.

“We’re a fully styled glamourous studio. So, we provide hair, makeup, shoes, jewelry, beautiful products, should you choose to want any,” Capps.

Capps’ goal with the studio is to help women see the best in themselves.

“We just empower women and we believe in women, trying to make our little footprint in the world to help women knock those insecurities that baffle us every single day of feeling worthy or beautiful. We get to do it and we get to change lives, it’s amazing!” she said.

Capps will also be opening up her studio to other photographers who are looking for a space to shoot for a small half hour and hourly rates. Plus, she will have predesigned holiday theme sets available and ready to use.

To book a photoshoot, contact Capps at 970-572-9624, email info@boudoirbynicole.com, or visit her website, https://ncappsphotography.mypixieset.com/.

The studio will be hosting a grand opening event Monday from 5 to 7 p.m. The first five people to enter the doors will get a special promo and everyone is invited to enter to win one of the many door prizes.

A Brief Primer On Image Editing and Photography For Real Estate Pros

A Brief Primer On Image Editing and Photography For Real Estate Pros

Having the right image editing and photography skills can make a world of difference in the real estate industry. Clear, vibrant photos not only optimally display a property’s characteristics but can captivate potential buyers in no time. Whether you’re a seasoned realtor or a newcomer to the field, mastering these visual techniques is instrumental to your selling success. 

MaleVideographerEditsAndCutsFootageAndSoundOnHis

10 Image Editing and Photography Tips for Real Estate Pros

From using natural lighting for a warm ambiance to post-editing tweaks that draw attention to the home, these tried and tested tips will elevate your real estate photography game ASAP.

1. Understand Your Camera Settings

Diving into the world of real estate necessitates a firm grip on your camera settings. You should familiarize yourself with aperture, white balance, ISO settings, and more. Using the right settings can enhance the quality of your photos, capturing property details in their true essence. 

2. Take Advantage of Natural Lighting

Natural lighting has the ability to accentuate room features in ways artificial light often can’t. Strive to time your shoots during peak daylight hours. This helps create an inviting, warm atmosphere in the property photos, appealing strongly to prospective buyers or tenants.

3. Easy Background Editing

Never underestimate the power of easy background editing. Efficient use of editing software like Picsart can transform an ordinary photo into a stunning shot. From replacing gloomy skies to removing unwanted objects, background editing is instrumental in creating an appealing image.

4. Use Tripods for Stability

Stability can greatly influence the quality of your photos. Using a tripod can mitigate hazards of unclear shots due to shaky hands or movement while capturing. This simple tool can ensure sharper, clearer images that paint an accurate and enticing picture of any property.

5. Embrace Wide-Angle Shots

As a real estate professional, it’s essential to embrace wide-angle shots. They can create a sense of spaciousness and depth, capturing the full essence of a property. But it’s crucial not to overdo it. Focused shots devoid of distortion will create an accurate perception of a property.

6. Play with Composition

In the realm of real estate photography, understanding and playing with composition can be a game-changer. Exploring perspectives like floor-level or bird-eye views can add an element of intrigue to your shots. With composition, you’ll combine creativity with property detailing.

7. Highlight Key Features

Without a doubt, focusing on key features is critical in capturing a building. Unique elements such as an expansive view, detailed architecture, or a stylish interior deserve to be emphasized. Highlighting these aspects can increase a property’s appeal and attract more potential buyers.

8. Use Artificial Lighting Smartly

Artificial lighting is a tool best used intelligently in photography. For poorly lit spaces, don’t hesitate to use flashes or LED lights. They can help maintain the color integrity and detail within your photos. A perfectly lit photograph showcases a property in its best possible light.

9. Focus on Clarity 

Clarity should be a top priority in real estate photography. High-resolution images with sharp, clear details leave a lasting impression on home buyers. From the brightness of room lights to the texture of a wood floor, vivid and crisp photographs allow buyers to appreciate your property.

10. Be Detail-Oriented in Post-Editing

Post-editing is a significant phase of photography in general. It’s essential to be detail-oriented during this process, as brightness adjustments and color correction can greatly amplify your images’ appeal. A professionally edited photo catches the eye more than an unedited one.

In Conclusion… 

Effective real estate photography goes beyond point-and-shoot. It’s an art, blending the right techniques with a keen eye for detail. Implement these image editing and photography tips into your routine, and watch how your realty business transforms and grows almost effortlessly.

Jamie is a 5-year freelance writer who enjoys real estate. He is currently a Realty Biz News Contributor.

Latest posts by Jamie Richardson (see all)

Today’s Photo from Ted Grussing Photography: Historical … Connected to Reality!

Today’s Photo from Ted Grussing Photography: Historical … Connected to Reality!

… whilst on a walk a few years ago during the golden hours of early evening I looked up at an empty lot near home and thought I saw as person laboring in the brush and overgrown weeds that covered the property … and then I looked a little more closely and saw that it was just a bent over yucca tree awaiting its final disposition, which was years in the making … or perhaps it is a very old soul contemplating all that was, that which is and that yet to come. Do we really know?

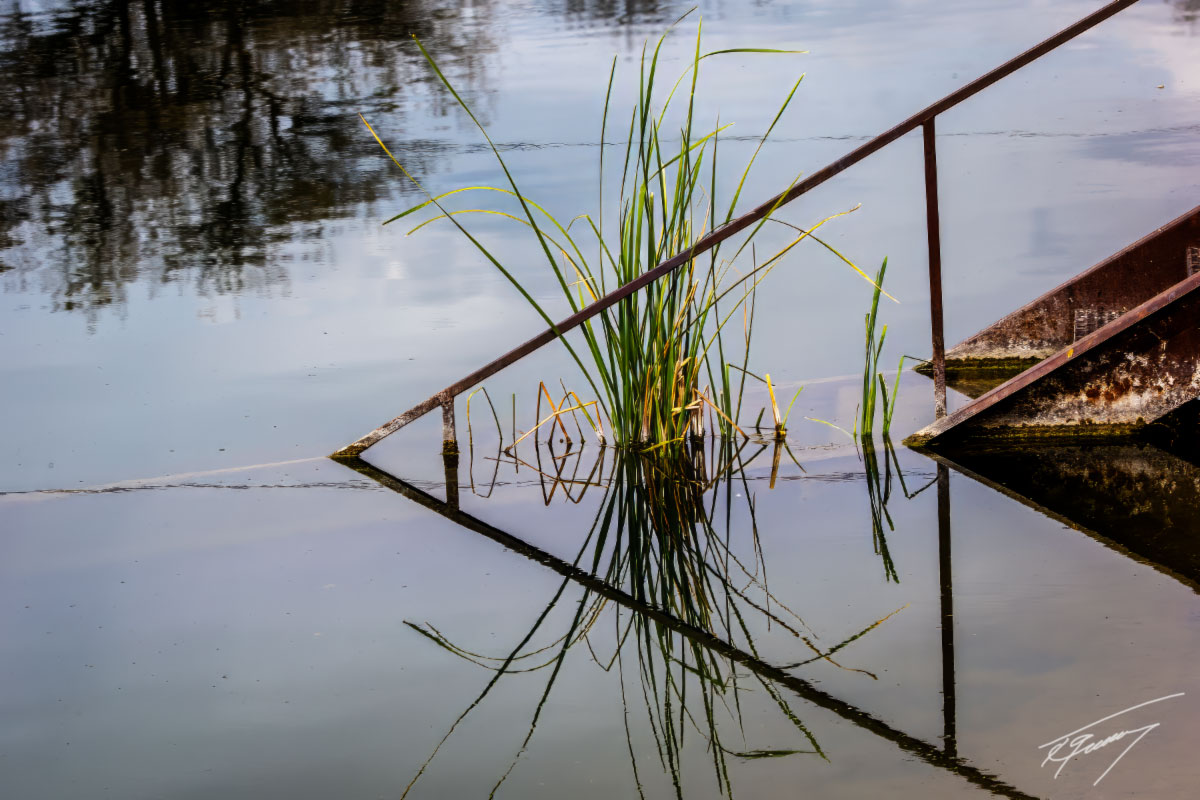
Below is a shot from Bubbling Ponds Fish hatchery in Page Springs … the water was quiet, and the reflections created near perfect symmetry. I like it and all was well with thousands of fish in the pond … herons, hawks, eagles and otters all waiting their turn to take from the abundance beneath the surface … the drama and saga of life on earth.

Over the weekend I got continual updates from the Weather Channel and other sources about what they called a historical storm … on the edge predicting doom and gloom as they reached fever pitch with warnings of epic and historical flooding headed towards California and the southwest in general … my Weather Channel app constantly carried news that historic flooding, loss of property and life was on the way.

From the time that I was a kid and we got our first television circa 1950, I have watched the weather made “historic” with cameras put down in the gutter to make an ordinary rainfall runoff look epic! On top of that we have everything being blamed on manmade climate change and we are told that we are destroying the planet.

A favorite “historic” and true stories is of when Leeland Stanford was inaugurated as the eighth governor of the State of California in January of 1862, he had to take a rowboat to the capitol to be sworn in because the city of Sacramento was underwater with true epic flooding and the central valley was a huge inland sea. In addition to northern California the storms affected the whole west coast and into Idaho, Utah, Arizona, New Mexico and Mexico … not only that, but this type of storm is not unusual and occurs ever hundred to two hundred years. Four thousand people in California died which was one percent of the population of California … an equivalent number today would be 395,000 people. The automobile had not yet been invented and we were just entering the industrial revolution. The Great Flood of 1862. A must read to gain perspective.

Leeland Stanford was also a very powerful force in California and the USA, It is a very fascinating story. He and his wife established Stanford University in memory of their late son Leeland Stanford Jr with an initial endowment of what today would be a gift in excess of a billion dollars.

I hope you will take the time to read these Wikipedia articles as they are well worth your time. They are factual and not hysterical as we see so frequently today.

First iteration of the Pepperdine presentation will be done by the weekend and then the final editing and tweaking until I give it on the 22nd of September.

I will be the featured artist at the Sedona Renegades Group in their gallery at the Hozho Center, 431 SR 179 Suite 6 in the heart of the gallery district in Sedona. A meet the artist will be held on Friday, September 1st beginning at 5PM … hope to see you there.

Have a beautiful day … smile and live life with gusto … only you can make that choice!

Cheers,

Ted

A bird flies through the sky, and I fly with it. I am in
each pearl of moisture sparkling in the sun. I lie lazy
on the clouds. And I acknowledge my kinship with
each winged thing.

I see all as one, and nothing repels me, as this new
day climbs noiselessly out of the valley of night.

Peace lies over the world and over the world of my soul.

excerpt from On a May Morning by Max Ehrmann

###

photo_tedgrussingThe easiest way to reach Mr. Grussing is by email: ted@tedgrussing.com

In addition to sales of photographs already taken Ted does special shoots for patrons on request and also does air-to-air photography for those who want photographs of their airplanes in flight. All special photographic sessions are billed on an hourly basis.

Ted also does one-on-one workshops for those interested in learning the techniques he uses.  By special arrangement Ted will do one-on-one aerial photography workshops which will include actual photo sessions in the air.

More about Ted Grussing


Healing Paws

Healing Paws

This is an advertisement