Photography by Dono featured in BRT exhibit

Photography by Dono featured in BRT exhibit
image

CUMBERLAND – Blackstone River Theatre’s Art Gallery will host an exhibition and sale of photography by Ken Dono, on display Jan. 20 through Feb. 24. The exhibit will be viewable two hours before and during scheduled theater events, in the upper and lower lobbies of BRT, 549 Broad St., Cumberland.

There will be an opening reception on Saturday, Jan. 20, from 1 to 2:30 p.m., open to the public. The BRT Art Gallery is an ongoing initiative to have the work of local visual artists combine with BRT’s performing arts programming to enhance the audience’s total experience.

Wildlife Photography Highlight of Southbury Library Exhibit

Wildlife Photography Highlight of Southbury Library Exhibit
image

SOUTHBURY — The Southbury Public Library will host the exhibit, “Capturing the Wild: Photographer James Ward Showcases Wildlife Beauty” in the Gloria Cachion Gallery from Friday, February 2, through Wednesday, February 28, at 100 Poverty Rd. James Ward, a wildlife photographer with a passion for preserving the beauty of the natural world, is dedicated to capturing breathtaking moments in the lives of animals big and small.

This exhibition is a testament to Mr. Ward’s commitment to raising awareness about the importance of wildlife conservation through the lens of his camera.

Visitors to the exhibit can expect to be enthralled by the vivid and intimate portraits of animals in their natural habitats.

From the majestic grace of African elephants to the delicate beauty of a flamboyance of flamingos, Mr. Ward’s keen eye and technical mastery bring these subjects to life with unparalleled clarity and detail.

The photographs represent Ward’s travel to remote wild spaces around the world, including Botswana, Zimbabwe, Tanzania, Indonesia, and Alaska.

Mr. Ward is also a safari guide and agent and his company, Safari Professionals, specializes in designing conservation-based safaris to Africa, India, Malaysia, Patagonia, Antarctica, and other wildlife destinations.

He also leads wildlife photography workshops to unique locations globally. He is a resident of Southbury with his wife, Hollie, and three daughters, Camryn, Payton, and Reagan.

The exhibit will be open during regular library hours which are 9:30 a.m. to 5:30 p.m. Monday, Wednesday, and Friday, from 9:30 a.m. to 9 a.m. Tuesday and Thursday, from 9:30 a.m. to 4 p.m. Saturdays, and from noon to 5 p.m. Sundays.

A sample of photos will be posted online in the virtual gallery.

Those seeking more information may visit www.southburylibrary.org or call 203-262-0626.

A New Photographer’s Guide to the Histogram

A New Photographer’s Guide to the Histogram

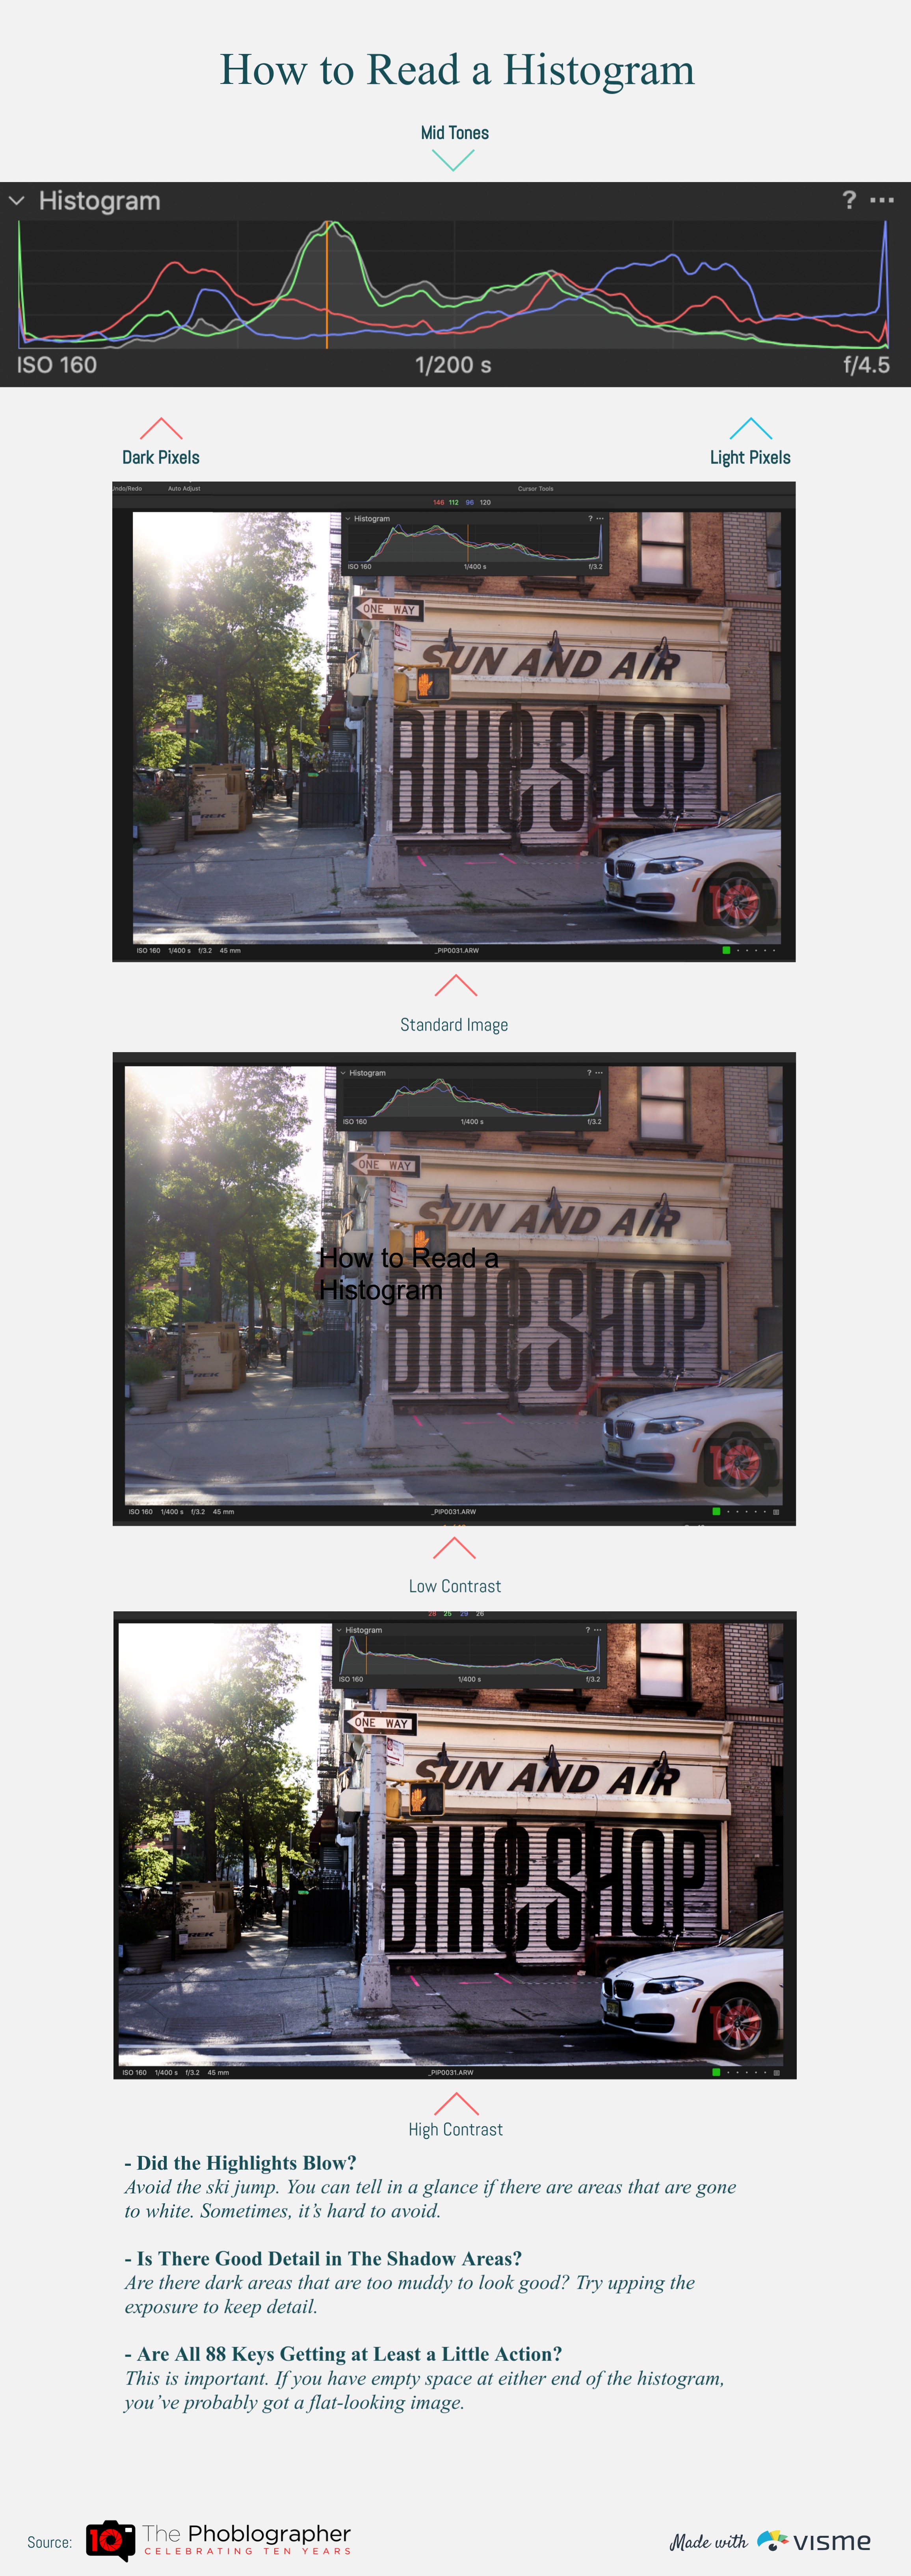
These days, lots of photographers don’t shoot photos according to the histogram. Instead, they look at the exposure preview and work off of that. But it’s good to know and understand what the histogram can do for you. In this post, we’re rounding up a bunch of tips that we’ve previously talked about in this one guide to the histogram.

This guide to the histogram is meant to help newer photographers more than anything. Over our 13 years as a site, we’ve done various articles on the histogram in different ways. There’s a lot to take in. And arguably, some of us don’t really need it anymore. I, for example, never shoot with it in mind. But that’s because of the way I shoot. I typically shoot like I’m shooting slide film. If you’re shooting photos with the intent of editing the photos later on in post-production, then you should consider the histogram.

This especially goes for folks who like high dynamic range images. Not all of us do. In fact, I really like seeing highlights completely blown out. I also believe that very deep black levels make the eye think that the image is sharper than it really is. So here are some tips on how to use the histogram where you can make your own decisions later on.

Consider also picking up a resource book about them too.

What is a Histogram

Here’s a quote from a previous article we did:

Histograms are charts that are designed to convey the information that an image currently has. They are created as the file is created from the camera and shift themselves accordingly as your image is edited. Photographers spending time in Lightroom or Photoshop changing the exposure level or color levels will see the Histogram shift in one direction or another.

What Does a Histogram Do?

Here’s a quote from a previous article we did:

As a review, the histogram shows how much of the scene you’re capturing will register as shadows, midtones, and highlights. The left side shows the shadow detail, the middle part shows the midtones, and the right side shows the highlights. So, the graph tells you what your overall exposure looks like. Keep in mind that different scenes will produce different histograms, so it’s important to check if the reading you’re getting is reflecting what you actually want to capture.

Reading a Histogram (And Our Own Guide to the Histogram)

Here’s a quote from an article we previously did. Also take a look at our guide to the histogram infographic we did above.

Histograms are graphs at their core. While their appearance can vary between different camera manufacturer’s user interfaces and raw editing software, they all typically look like some variation of a line graph. This means histograms basically follow the same conventions that go into creating line graphs. The X-axis (horizontal) is generally used to indicate the light value, going from dark to light pixels from left to right. The Y-axis (vertical) is used to indicate the amount of said light value that is present. Depending on your camera or software, the various lines within the histogram correspond to how much highlights, mid-tones, shadows, and color information are present within an image. Also, remember that although histograms are useful guides, you’re ultimately the creative behind the camera. Depending on how you want your final image to appear, you may sometimes want to intentionally over or underexpose it, resulting in a histogram that looks “wrong.”

The Basics of the Histogram

Here’s a quote from an article we did on this subject:

Good editing and histograms start with shooting them to begin with. The image that we’re working with and that you’ll see later will show you exactly what happens when images are edited accordingly.

Here’s the basics:

  • The left skews towards the shadows
  • The right skews towards the highlights
  • The middle is the balanced midtones.

Essentially what you want to get for a more uniform viewing experience is something that is very balanced all around. Of course, this also varies based on your own creative vision and whether you like the look of a super dark image or a super bright one. But keep all of this in mind as you edit.

Understand Contrast

Here’s a quote from an article we did on contrast and histograms.

Contrast quite literally talks about the difference between the brightest brights and the darkest darks. If the full gamut isn’t in there, then it’s a high-contrast image. Bring any photo into your favorite editing software and just play with the files. This tends to make things pop at the expense of details. But modern camera sensors and coatings tend to mitigate that. This can fool the eye into thinking it’s sharper than it really is. If you look closely at images from medium format lenses, you can see just how sharp they are. They’re doing this with the low contrast of film. But when you add it to an already sharp optic, the images look even sharper.

Histograms Are Based on JPEG Settings Not RAWs

Here’s a quote from an article where we state this:

Also, he reminds us that the histogram we see in-camera is based on the JPEG version, not the RAW file, which shows the most accurate reading. This is why it’s important to shoot in RAW because you wind up with a bigger latitude in post. Lastly, he tells us that different lenses will produce different histogram results of the same scene because each lens tends to let in light differently.

More than just beaches and sunshine: Photographer telling bigger Florida conservation story

More than just beaches and sunshine: Photographer telling bigger Florida conservation story

“People are going to protect what they love and they’re not going to love what they can’t see,” Carlton Ward, Jr. said.

TAMPA, Fla. — We’ve all heard the phrase a picture is worth a thousand words. But is it worth, say, a thousand acres? With his latest exhibit, a local conservation photographer is proving that it is. 

Carlton Ward, Jr. hopes to show the world that Florida is so much more than just beaches and sunshine. 

Ward spent the better part of his career as a National Geographic photographer using his photos to help preserve some of the most beautiful parts of our state. Most recently by telling the story of the path of the endangered Florida panther

“It’s an amazing comeback story,” Ward said. “There were fewer than 20 in the 1970s and 80s and then nearly 200 today, but without the conservation of the Florida wildlife corridor there’s no hope for recovery because we need to have 3 or 4 times as many panthers to have a genetically viable population.”

Ward was on assignment in 2006 when he began his mission to help create a wildlife corridor in Florida, by using pictures to tell the story of how our land is truly connected and why it needs to stay that way. 

“That’s the state park, the National Wildlife Refuge, the cattle ranch, the timber farm,” Ward explained as he showed pictures. “It’s that connected green space and the panther, there’s no better character to invite us into that story and to show us literally by their movements and their needs what we need to do to save wild Florida.”

And little by little the photos are working, helping to protect and preserve nearly 10 million acres of wild Florida. 

“People are going to protect what they love and they’re not going to love what they can’t see.” 

And it’s hard not to be inspired by these beautiful animals, that people rarely see in the wild. 

“She’s the hero of the story. She’s the hero of the Path of the Panther film and this real emblem of hope for the recovery of her species and the Florida wildlife corridor.”

In fact, just getting enough photos for this exhibit took years of hard work and special cameras set up in strategic places. 

“It’s a professional camera in a waterproof box with strobe lights and an infrared trigger where you set it up on a trail to help the panther walk through and take its own picture.”

Ward’s exhibit is more than just panthers, it’s the people, the places, and the projects all coming together to tell a much bigger story about the land that gives us life. 

“As a conservation photographer, I want to show the beauty and the hope and I want to show the reality and concern so we can understand the story and understand what steps we can take to make it better.”

You can see the Path of the Panther exhibit right now at the Florida Museum of Photographic Arts in Ybor City. There’s also a documentary film and a book featuring the story behind the pictures. 

[embedded content]

Joel Meyerowitz is the master of color photography

Joel Meyerowitz is the master of color photography

Over the past year, the internet seems to be obsessed with food culture, fueling a trend that is now evident even in the world of visual culture. From the Tomato Girl Summer, which many mock retrospectively, to the foodie fashion girlies, Balenciaga’s collaboration with Erewhon, and the massive success of The Bear. Food appears to be experiencing a rebirth, but in the worlds of art, photography, and design, it has always been present. Is this just a passing trend, or is it the glorification of an element that has always been part of our lives?

Un’illustrazione di Maisy Summer

From Tomato Girl Summer to the pomegranate

It was only in 2020, with lockdown recipes—does anyone remember Dalgona Coffe?—that so much talk about food emerged. On TikTok, @wishbonekitchen made us dream by showing us her life as a private chef in the Hamptons this summer. Unforgettable were her Heirloom Tomato Gallette and the garden where she harvested fruits, vegetables, and herbs. In 2023, it seems to have been the summer of food not only with the release of the second season of The Bear but also with Tomato Girl Summer. On the other hand, according to Danielle Cohen on The Cut, it now seems to be the time of the pomegranate.

Thanks to its shape and the vivid red that characterizes it, this fruit is widely recognized as a symbol of fertility in many parts of the world. But not only that, we find the pomegranate in mythology, art history, and, according to Cohen, even in the Torah. In short, fruits and vegetables seem to be largely protagonists of this rebirth, so we have collected some works and photographs by artists and photographers we have talked about in the past and more.

Browsing through our archives, we remembered Michael Crichton‘s photos and his photographic series, Conceptual Food, as well as Dan Bannino, who many years ago narrated the eating habits of the powerful. But there is also Stephanie Sarley, an artist who, with fruit fingering, challenged the way the art world has represented the female reproductive organ throughout its history.

Why it seems not to be just a passing trend

The success of food in visual culture can be attributed to its tangible communicative power. We see and experience the colors and textures of food daily, all evocative elements of memories that we have been collecting forever. In conclusion, we can only wonder which will be the next fruit to receive all this attention, already dedicated to tomatoes and pomegranates, even before avocados and bananas.

Become a slow shutter speed expert!

Become a slow shutter speed expert!

One of the greatest magic tricks in photography is long exposure photography, producing images that freeze a moment yet still capture movement and dynamism. 

However, even the best mirrorless camera technology cannot produce these images alone; the photographer must have the right knowledge, equipment and, hopefully, a trick or two up their sleeves. 

You can see any number of long exposure shots of familiar subjects on social media, and it can be difficult to think outside the box. So, I’ll show you how to detach yourself from familiar situations and take a unique approach that will enable your shots to stand out from the crowd. 

Get ready

Prepare for long exposure 

To maximize the quality of your long-exposure images, it is essential to know how to use your equipment like a pro. Modern camera technology is highly capable, but don’t rely on it alone – a camera is only the base, and there are many other things to consider. 

In this genre of photography, it can be disappointing to wait 30 seconds or more only to realize that you have set the technical parameters incorrectly. Exposure time, aperture, sharpness, image noise and composition are the key factors that will determine the quality of a long exposure shot. Slow shutter speeds are mainly used for outdoor shots, but be aware of the challenges as you cannot control the environment. 

Pack your kit

(Image credit: Future)

Wide-angle lens
Working with a wide-angle lens possessing a focal length of 35mm or wider is ideal for long-exposure landscape shots, as a greater expanse of the scene can be captured and more elements included in the composition.

Heavy-duty tripod
A carbon fiber tripod will prevent camera shake. You may also need to carry an extra weight, such as a sandbag, in your kitbag to ensure that the tripod remains stable even in strong winds. 

Remote release
Avoid jeopardizing the exposure with even slight movements of the camera. Use a remote control cable, shoot wirelessly via an app, or use the self-timer function of the camera.

Pro Tip: DSLRs

When using exposure times of 30 seconds or longer, do not leave the viewfinder of your DSLR open. Otherwise, even small light sources outside the composition will create unwanted effects. Most cameras already come with a viewfinder cover, or have an option to automatically close it. If not, use any other material to prevent extraneous light from entering.

Neutral Density Filter
Use ND filters with up to ten stops to take control of the lighting conditions. This enables you to increase the shutter speed even in bright light, without the risk of overexposure.

Polarizing Filter
If shooting directly against the sun, using polarizing filters will remove unwanted glare. The filter’s tint will improve the overall appearance of your subject in terms of contrast and saturation.

Black card
If your scene contains elements of different brightness, card can be used to cover certain parts of the lens while the photo is exposed.

Filter holder systems

Consider the types of filter holder systems

(Image credit: Future)

When integrating filters into your workflow, it is advisable to invest in square filter holders right from the start. They are more expensive, but offer better value for money and more advantages. Especially if you are working with different lenses, square filters are versatile and easy to mount without the risk of accidentally shifting the focus.

To avoid vignette effects, pay attention to your filter slots and remove any that aren’t necessary. If working with wider lenses and smaller filters, do not use step-down rings as these also lead to hard vignetting.

Control exposure

How to control exposure settings 

One of the major challenges that low-light photography presents is how to calculate the correct exposure time. There are plenty of apps and websites that can automatically calculate the time based on your aperture, ISO and any filters. 

Spot metering or experimentation are other options, but finding the appropriate exposure settings can take a while – especially when you try out exposures over minutes, and therefore have to wait a long time until the shot is recorded!

Pro Tip: Filters

The ND filter offers the possibility to extend the shutter speed and improve images in situations where only two stops more will make the difference. ND filters usually come with an exposure table that facilitates easy adjustment of exposure settings.

A simple way to save time is to work backwards, using shorter exposures and higher ISO settings first. After a few test shots, you may be able to determine the optimal settings – and now the ISO value can be minimized in a few steps. Decrease the ISO setting by a stop and simply double the exposure time; do this until the value is 500 or less.

By setting a minimum ISO value and a medium aperture of f/8, you enable a longer exposure time and create a decent depth of field. The shutter speed can vary greatly but, in general, you can say that at least five seconds is required in most situations. When it comes to capturing slow-moving clouds or car trails, that could be as much as 120 seconds. 

Use noise reduction 

(Image credit: Future)

Many cameras have a noise reduction feature for capturing long exposures in low light, where unwanted hot pixels are automatically removed from the final image. The camera automatically records another photo after the exposure, and will therefore need twice the exposure time.


Select Bulb and Time mode

(Image credit: Future)

Depending on your visual objectives, light sources and the time of day, you may want to extend the shutter speed beyond 30 seconds. To do this, switch to Bulb mode to take control of the time that the shutter stays open. Remember to work with a remote shutter release or via an app, as it is almost impossible to hold the shutter button down for that length of time without causing movement. 

Many high-end cameras have a Time mode, which offers a clear advantage over Bulb. Here you simply press the shutter button or remote release once and, when you want to finish the exposure, press it again.

Check results

(Image credit: Future)

Remember that the LCD screen can be misleading about the brightness of the results, especially if you are shooting in low light conditions. To make sure that exposures are correct, analyze the histogram. 

An ideal graph will show a fairly even distribution of tones; if the histogram shows much closer values on either the left or right side, some parts of the image may be severely overexposed or underexposed. That means the exposure time wasn’t ideal for the subject and should be adjusted.


You may be interested in the best cameras for landscape photography, along with the best lenses for landscapes

Shrimp & star bag Underwater Close-up win

Shrimp & star bag Underwater Close-up win

Australian photographer Simon Theuma has won the highly competitive Underwater category in the fifth annual Close-up Photographer of the Year (CUPOTY 5) competition, with his work Dreamtime.

CUPOTY was started in 2018 by UK-based Tracey and Dan Calder, with the aim of revealing hidden wonders of the world through close-up, macro and micro photography, though the Underwater category is a more recent addition. The couple say that the 2023 competition attracted almost 12,000 entries from 67 countries. 

The 11 category winners and Top 100 close-up photographs were selected by a jury of 23 photographers, scientists, naturalists, journalists and picture editors through 20 collective hours of deliberations on Zoom, with underwater photographers Angel Fitor and Scott Portelli among the judges.

“Like an intricate tapestry of the marine ecosystem, this image captures the relationship between a commensal shrimp and a mosaic sea star,” said Theuma, describing his winning shot. “Dreamtime Aboriginal art reminds us of the delicate balance that exists in the grand tapestry of our natural world – this ancient wisdom serves as an important reminder to preserve what we have. 

“To capture this image, I needed to use a snooted strobe, which was set at an acute angle to the subject. This set-up accentuated the depth and beautiful texture of the two organisms. Additionally, I enhanced magnification by using a +15 wet lens dioptre.” 

(Dreamtime was taken using a Nikon D850 + 85mm f2.8G lens, Sea&Sea housing, YS-250 Pro strobes, Inon UCL67 +15 Wet Dioptre and snoot, 1/200th, f/14, ISO 64)

Underwater runners-up

Second place in the Underwater category went to Heart Of The Sea, an image captured on a blackwater night dive in Romblon in the Philippines by Chinese photographer Liang Fu, who explained how it had come about. 

Heart Of The Sea (© Liang Fu / CUPOTY 5)

“I saw something shining under my searchlight at 28m deep. As I swam closer to investigate, I found a lava moray eel curled into a heart shape. I was extremely fortunate to capture this moment with my camera.

“The eel remained at that depth for less than 10 seconds before swimming down and disappearing into the darkness.” (Taken with a Canon EOS R5 + Canon RF 35mm F2.8L MACRO IS USM, two strobes, 1/200th, f/13, ISO 400)

Third place was awarded to US diver Chris Gug for Pinkaboo, taken in Misool in Indonesia’s West Papua. “For years, I had been wanting to make a relatively simple image of a golden damselfish set against a background of red sea whip coral,” said Gug. 

“But on multiple trips to various South Pacific diving locations, there was always some problem with the sea whips – one branch would be broken, lack of current caused the polyps to be retracted, the damselfish was too rough… just always something to make me cringe with OCD! 

Pinkaboo (© Chris Gug / CUPOTY 5)

“So when I found this little gem living in what are clearly not red sea whips, I had to twist my mind out of its rigidity, and realise that the gorgonian coral background I was searching for was indeed a different species, and was right in front of me! 

“As a traditional fisheye-lens shooter, water-contact optics have been a game-changer in underwater wide-angle photography. While not quite as wide as a fisheye lens, they still cover a large field of vision, while maintaining far superior corner sharpness, and don’t introduce the extreme barrel distortion of a fisheye lens. 

“Using Nauticam’s revolutionary WACP-1 lens/port allowed me to use a medium zoom, and create a close-focus wide-angle view from just a few inches away that, unlike a fisheye lens, appears flat and maintains focus on the entire coral environment.” (Taken with a Nikon D850 + AF Nikkor 28-70mm f/3.5-4.5D, Nauticam housing, WACP-1 lens / port, dual Ikelite DS-161 strobes, 1/50th, f/14, ISO 320)

Other Top 100 Underwater images

Other images entered in the Underwater category to make the CUPOTY 5 Top 100 included:

Pisces Constellation (© Csaba Daróczi / CUPOTY 5)

Hungarian Csaba Daróczi’s Pisces Constellation showed freshwater fish gathered in a pond on a moonlit night in Soltvadkert, Hungary. Daróczi was in fact awarded the title Close-up Photographer of the Year 5, but for a topside bird picture, showing a Eurasian nuthatch in flight. (Taken with a Nikon Z6 + Laowa 15mm f/4 Wide Angle Macro lens, self-made stand, two strobes, 30sec, f/4-22, ISO 4000)

Gimme Shelter (© Henley Spiers / CUPOTY 5)

UK diver Henley Spiers’ Gimme Shelter showed a juvenile fish sheltering in the open eastern Pacific beneath a blue button hydroid. (Taken with a Nikon D850 + 28-70mm f/2.8 AF-S, Nauticam housing, 1/500th, f/13, ISO 800)

Entourage (© Jake Wilton / CUPOTY 5)

A reef manta ray with an entourage of juvenile golden trevally at Ningaloo Reef was the subject of Australian photographer Jake Wilton’s composition Entourage. (Taken with a Nikon D810 + Nikkor AF-S Fisheye 8-15mm f/3.5-4.5E ED, 1/250th, f/9, ISO 640)

Juvenile Anglerfish (© Koji Shinke / CUPOTY 5)

Koji Shinke from Japan captured this Juvenile Anglerfish at Osezaki in Numazu Shizuoka. (Taken with a Nikon D810 + 105mm f/2.8 Sea&Sea housing, two Retra Flash Pro strobes, 1/250th, f/16, ISO 160)

Cloud Nine (© Laura Storm / CUPOTY 5)

Laura Storm from the UK took Cloud Nine, showing a ghost goby in Lembeh Strait, Indonesia, hiding among the undulating textures and swirls of its pink sponge daybed. (Taken with a Canon EOS 800D + EF-S 60mm f/2.8 Macro USM, two INON s2000 strobes with filters, Sea&Sea RDX750 housing with DX Macro Port 52, Light & Motion Sola 1200 focus light, 1/80th, f/14, ISO 200)

Alpine Water Salamander (© Luc Rooman / CUPOTY 5)

Belgian Luc Rooman’s Alpine Water Salamander rests on a water lily prior to surfacing, in a freshwater lake at De Melle, Antwerp. (Taken with a Nikon D500 + 16-35mm f/4, two Subtronic strobes, 1/160th, f/22, ISO 100

Fairy Shrimp Showing Colourful Eggs (© René Krekels / CUPOTY 5)

Fairy Shrimp Showing Colourful Eggs, taken in Germany, is the self-explanatory title of this photograph by Netherlands biologist René Krekels. (Taken with a Canon R5 + MP-E 65mm f/2.8 1-5x Macro lens, strobes, 1/250th, f/8, ISO 250)

In the Moonlight (© Sandra Stalker / CUPOTY 5)

Finally In the Moonlight, by a third British photographer, Sandra Stalker, shows a stalked jellyfish clinging to seaweed in turbulent waters at Kimmeridge Bay in Dorset. (Taken with a Sony A7R IV + Meyer Optic Trioplan 50 vintage lens, Nauticam housing, two Backscatter miniflashes and two strobes, one with a blue filter, one with a snoot, 1/320th, f/2.8, ISO 50)

‘Best yet’

These and other shortlisted Underwater CUPOTY entries can be seen in an online gallery, along with the Top 100 entries in all the other categories, which are: Animals, Insects, Butterflies & Dragonflies, Invertebrate Portrait, Plants, Fungi & Slime Moulds, Intimate Landscape, Human Made, Micro (images created using a microscope) and Young Close-up Photographer of the Year (17 or under).

“Thanks to these creative and original pictures, I now know that tadpoles can eat birds, ants fire acid like water-pistols and bees sometimes hold each other’s legs while they sleep,” says Tracey Calder.

“Personally, I think this is our best collection of winning images yet, and I’m so grateful to those who entered, as it allows us to see and learn from their work, and to recognise how incredible and surprising the world is.”

The competition is supported by Affinity Photo 2, Nikon, Zerene Stacker, Datacolor, NiSi, Greenwings Wildlife Holidays and Sigma UK. Category winners receive a universal licence for all three Affinity apps (Photo, Designer + Publisher) for macOS, Windows & iPadOS. 

Entries for CUPOTY 6 open in May. Divers wishing to enter can receive details by signing up to the newsletter.

Also on Divernet: 10 underwater close-ups that seduced judges

Xiaomi 14 Ultra Camera Kit Allegedly Gets 3C Certification

Xiaomi 14 Ultra Camera Kit Allegedly Gets 3C Certification

Xiaomi is expected to launch the Xiaomi 14 Ultra soon as a successor to last year’s Xiaomi 13 Ultra. A few details about the upcoming handset have already leaked on the Web in the past weeks. Most recently, an alleged designated camera kit of the Xiaomi 14 Ultra with the model number 2402CPS69C has purportedly appeared on the China Compulsory Certification (3C) website. Xiaomi 13 Ultra was launched with a camera accessory kit that includes accessories like a camera grip and a protective case. The Xiaomi 14 Ultra is expected to come with a quad rear camera unit.

Tipster Digital Chat Station (translated from Chinese) on Weibo posted screenshots of the alleged 3C listing of Xiaomi wireless professional camera kit. The listing suggests model number 2402CPS69C with a maximum output of 1,500mAh at 5V. The kit could also work as an external battery. The first digits of the model number indicate a February 2024 launch.

The Xiaomi 13 Ultra was released with a designated camera kit priced at CNY 999 (roughly Rs. 11,500) to convert the handset into a full-fledged camera. The kit is exclusive to the Chinese market and includes a case, a camera grip, a lens cover, and a 67mm adapter ring.

Xiaomi 14 Ultra is expected to feature a 6.7-inch AMOLED screen with 2K resolution and 120Hz refresh rate. The phone is tipped to include a quad rear camera setup comprising four 50-megapixel cameras. The camera unit might carry a Sony LYT900 as the primary sensor with an f/1.63 aperture. 

Qualcomm’s Snapdragon 8 Gen 3 SoC is expected to power the Xiaomi 14 Ultra. It is said to have slightly curved screens and an ultrasonic in-display fingerprint scanner for authentication. The phone is tipped to get a 5,180mAh battery with 90W wired charging support and 50W wireless charging support.


Xiaomi launched its camera focussed flagship Xiaomi 13 Ultra smartphone, while Apple opened it’s first stores in India this week. We discuss these developments, as well as other reports on smartphone-related rumours and more on Orbital, the Gadgets 360 podcast. Orbital is available on Spotify, Gaana, JioSaavn, Google Podcasts, Apple Podcasts, Amazon Music and wherever you get your podcasts.
Affiliate links may be automatically generated – see our ethics statement for details.